WELCOME

2009年8月28日 星期五

反擊電腦病毒佔領

FREE Dr.Web CureIt!® Utility

Easy to use FREE curing utility to clean your computer infected with viruses and various unwanted codes by the Dr.Web Anti-virus updated once or several times an hour.

http://www.freedrweb.com/cureit/

Auslogics Task Manager

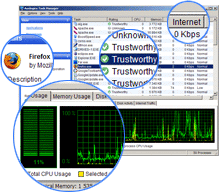
Use Auslogics Task Manager to get information about processes running on your computer. Auslogics Task Manager will help you decide whether to trust a suspicious-looking process or not. Auslogics Task Manager will not only help you control your computer, but also browsing the Internet. Auslogics Task Manager will help you gather information about your computer CPU usage.
Auslogics
Task Manager
will help you keep your
computer under total control.
Control your computer and Windows, manage your computer resources to fit your particular needs.

The program lets you track all running applications, processes, services, and even all open files.


...This program really lets you control Windows processes. Also it looks great, just like all Auslogics utilities...
- CNet Comments

2009年8月27日 星期四

svchost.exe占用CPU 100%的解决方法

问题:机子一到下午就出现卡机现象,资源管理器看到的是svchost.exe占了100%的CPU资源

解决:
假设你已经使用了免费杀毒软件排除了病毒和已经使用防间谍软件排除了恶意软件的影响:
想办法清空C:\WINDOWS\SoftwareDistribution 目录下所有的文件重启机器即可。(C:\WINDOWS\SoftwareDistribution是Windows update服务的临时文件存放目录)
如果机器提示文件正在使用("Automatic Updates"服务正在运行)无法删除相应目录:
•则想办法打开控制面板==>管理工具==>服务,找到"Automatic Updates",设置成手动启动,
•重启后再删除 C:\WINDOWS\SoftwareDistribution。问题就解决了。
•然后再打开控制面板==>管理工具==>服务,找到"Automatic Updates",恢复成自动启动重启。

注意:重启后最好在上网条件比较好的地方让系统顺利完成一次系统自动更新。

原因分析:
先说说什么是svchost.exe:简单的说没有这个RPC服务,机器几乎就上不了网了。很多应用服务都是依赖于这个RPC接口的,如果发现这个进程占 了太多的CPU资源,直接把系统的RPC服务禁用了会是一场灾难:因为连恢复这个界面的系统服务设置界面都无法使用了。恢复的方法需要使用注册表编辑器, 找到 HKEY_LOCAL_MACHINE >> SYSTEM >> CurrentControlSet >> Services >> RpcSs, 右侧找到Start属性,把它的值改为2再重启即可
造成svchost占系统CPU 100%的原因并非svchost服务本身:以上的情况是由于Windows Update服务下载/安装失败而导致更新服务反复重试造成的。而Windows的自动更新也是依赖于svchost服务的一个后台应用,从而表现为 svchost.exe负载极高。 常发生这类问题的机器一般是上网条件(尤其是去国外网站)不稳定的机器,比如家里的父母的机器,往往在安装机器几个月以后不定期发生,每个月的第二个星期 是高发期:因为最近几年MS很有规律的在每个月的第二个星期发布补丁程序)。上面的解决方法并不能保证不重发作,但是为了svchost文件而每隔几个月 重装一次操作系统还是太浪费时间了

超級WiFi搜尋王

Download WeFi for reliable connection to Wi-Fi anywhere a wireless network is available, see online status and location of friends and find an available hotspot anywhere around the world!

v3.6

http://www.wefi.com/download/

2009年8月26日 星期三

強制刪除被鎖定的檔案

LockHunter is a foolproof file unlocker

It is a free tool to delete files blocked by something you do not know. LockHunter is useful for fighting against malware, and other programs that are blocking files without a reason. Unlike other similar tools it deletes files into the recycle bin so you may restore them if deleted by mistake.

http://lockhunter.com/

資料夾同步好幫手(FreeFileSync)

http://freefilesync.sourceforge.net/

Exchange Server 2007 Service Pack 2

下載網址:

http://www.microsoft.com/downloads/details.aspx?FamilyID=4c4bd2a3-5e50-42b0-8bbb-2cc9afe3216a&DisplayLang=zh-tw

Exchange Server 2007 SP2 的新功能

Microsoft Exchange Server 2007 Service Pack 2 (SP2) 為每種伺服器角色引進許多新功能。本主題討論在您安裝 Exchange 2007 SP1 時新增的新功能及改進功能。

若要下載 Exchange 2007 SP2,請參閱 Exchange Server 2007 下載

只要組織中所有 Client Access Server 都已升級至 Exchange Server 2007 Service Pack 2 (SP2),您就可以在組織中部署 Exchange Server 2010。此外,無論伺服器角色為何,您要轉換之 Active Directory 站台中的任何 Exchange 2007 伺服器都必須升級至 Exchange 2007 SP2。

Exchange 2007 Service Pack 2 包含 Windows Server Backup 的 VSS 外掛程式,可以支援 Exchange 備份工作。安裝好 SP2 後,您就可使用 Windows Server Backup 來備份和還原 Exchange 2007 SP2 資料庫。所提供的新外掛程式是名為 WSBExchange.exe 的單一可執行檔,SP2 會自動將此外掛程式安裝至所有 Exchange 2007 Mailbox Server。外掛程式會啟用 Windows Server Backup 進行 Exchange 感知的 VSS 備份。如需此功能以及如何使用的相關資訊,請參閱 使用 Windows Server Backup 備份及還原 Exchange 資料

新的 Exchange 稽核事件和稽核記錄存放庫,讓 Exchange 系統管理員能夠更輕鬆地稽核 Exchange 伺服器上所發生的活動。透過專用的稽核記錄存放庫,可以在資料精細度、效能以及輕鬆存取稽核事件之間取得平衡。藉由將稽核事件隔離在專用位置,可簡化稽核 處理,也讓稽核事件的檢閱更加容易。如需 SP2 所提供之新稽核功能的相關資訊,請參閱 瞭解 Exchange Server 2007 Service Pack 2 中的 Mailbox Access Auditing

動態 AD 架構更新和驗證功能可讓您動態部署未來的架構更新,並能在新內容加入至 AD 架構時,主動防止衝突。部署此功能後,可以更輕鬆管理未來的架構更新,並防止將原本 AD 架構中沒有的內容加入時可能發生的支援問題。如需動態 Active Directory 架構驗證的相關資訊,請參閱 Exchange 2007 SP2 中的動態架構更新與驗證

Exchange 2007 Service Pack 2 改善了目前的指令程式,並移除執行管理工作時公用資料夾分工編寫和版本管理的依存性,藉以提供更有效的公用資料夾配額管理方法。如需新公用資料夾配額管理功能的相關資訊,請參閱 Set-PublicFolder 指令程式說明文件。

SP2 新增了數個新的指令程式參數,供您集中管理許多 Exchange 組織設定。

重新將硬碟Resize

http://www.partitionwizard.com/

免費網絡傳真服務

http://www.myfax.com/free/

如何開啟 Windows XP 中的自動登入

您可以使用「登錄編輯程式」新增您的登入資訊。如果要執行這項操作,請依照下列步驟執行:
  1. 按一下 [開始],再按一下 [執行],輸入 regedit,然後按一下 [確定]
  2. 找出下列登錄機碼:
    HKEY_LOCAL_MACHINE\SOFTWARE\Microsoft\Windows NT\CurrentVersion\Winlogon
  3. 使用您的帳戶名稱及密碼,按兩下 [DefaultUserName] 項目,輸入您的使用者名稱,再按一下 [確定]
  4. 按兩下 [DefaultPassword] 項目,在 [數值資料] 方塊下方輸入您的密碼,再按一下 [確定]

    如果沒有 [DefaultPassword] 值,請建立該值。如果要執行這項操作,請依照下列步驟執行:
    1. 在「登錄編輯程式」中,按一下 [編輯],按一下 [新增],再按一下 [字串值]
    2. 鍵入 DefaultPassword 作為數值名稱,再按下 ENTER。
    3. 按兩下新建立的機碼,然後在 [數值資料] 方塊中輸入您的密碼。
    如果沒有指定 DefaultPassword 字串,Windows XP 會自動變更 AutoAdminLogon 登錄機碼的值,從 1 (真) 改成 0 (偽) 以關閉 AutoAdminLogon 功能。
  5. 按兩下 [AutoAdminLogon] 項目,在 [數值資料] 方塊中輸入 1,再按一下 [確定]

    如果沒有 AutoAdminLogon 項目,請建立該項目。如果要執行這項操作,請依照下列步驟執行:
    1. 在「登錄編輯程式」中,按一下 [編輯],按一下 [新增],再按一下 [字串值]
    2. 鍵入 AutoAdminLogon 作為數值名稱,再按下 ENTER。
    3. 按兩下新建立的機碼,然後在 [數值資料] 方塊中輸入 1
  6. 結束 [登錄編輯程式]。
  7. 按一下 [開始],按一下 [重新開機],再按一下 [確定]
電腦重新開機而且 Windows XP 啟動之後,您就可以自動登入。

如果您想略過自動登入,而要以另一個使用者身分登入系統,請在登出之後或者 Windows XP 重新啟動之後,按住 SHIFT 鍵。請注意,此程序只適用於第一次登入。如果要在未來的登出情況強制套用這項設定,系統管理員必須設定下列登錄機碼:
HKEY_LOCAL_MACHINE\SOFTWARE\Microsoft\Windows NT\CurrentVersion\Winlogon

數值:ForceAutoLogon
類型:REG_SZ
資料:1
您也可以在未加入網域的 Microsoft Windows XP Home Edition 與 Microsoft Windows XP Professional 電腦上,不需編輯登錄就可開啟自動登入功能。如果要執行這項操作,請依照下列步驟執行:
  1. 按一下 [開始],再按一下 [執行]
  2. [開啟] 方塊中,輸入 control userpasswords2,再按一下 [確定]

    注意 當使用者嘗試在 Windows XP Home Edition 的 [使用者帳戶] 視窗中顯示說明資訊時,並不會顯示說明資訊。此外,使用者會收到下列錯誤訊息:
    找不到 Drive:\Windows\System32\users.hlp 說明檔,檢查以查看檔案是否在硬碟機上。如果檔案不存在,您必須重新安裝它。
  3. 請清除 [必須輸入使用者名稱和密碼,才能使用這台電腦] 核取方塊,再按一下 [套用]
  4. [自動登入] 視窗的 [密碼] 方塊中輸入密碼,然後在 [確認密碼] 方塊中重新輸入密碼。
  5. 按一下 [確定] 關閉 [自動登入] 視窗,然後按一下 [確定] 關閉 [使用者帳戶] 視窗。

2009年8月25日 星期二

WinXP 顯示內容的[桌面]和[螢幕保護裝置]頁夾不見了!

執行左下角[開始]-->[執行]-->gpedit.msc
找到[使用者設定]-->[系統管理範本]-->[控制台]-->[顯示]
將下列2項索引標籤的值設為[尚未啟用]or[停用]
1.隱藏[桌面]索引標籤
2.隱藏[螢幕保護裝置]索引標籤

2009年8月18日 星期二

測試寬頻

http://speedtest.net/

備份及重裝Driver

DriverMax.com, the place where you can
download the latest driver updates for Windows 7, Windows Vista and Windows XP...


http://www.drivermax.com/

2009年8月17日 星期一

Mouse效能測驗軟件

雙飛燕 鼠青天鼠標品質分析程式

http://6520.software.informer.com/5.0/

更改別人字幕檔案

Subtitle Workshop

http://www.urusoft.net/download.php?lang=1&id=sw

BlueScreen view

Description

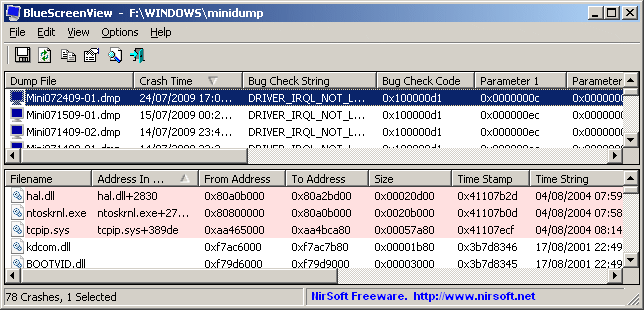
BlueScreenView scans all your minidump files created during 'blue screen of death' crashes, and displays the information about all crashes in one table. For each crash, BlueScreenView displays the minidump filename, the date/time of the crash, the basic crash information displayed in the blue screen (Bug Check Code and 4 parameters), and the details of the driver or module that possibly caused the crash (filename, product name, file description, and file version).
For each crash displayed in the upper pane, you can view the details of the device drivers loaded during the crash in the lower pane. BlueScreenView also mark the drivers that their addresses found in the crash stack, so you can easily locate the suspected drivers that possibly caused the crash.

BlueScreenView Features

  • Automatically scans your current minidump folder and displays the list of all crash dumps, including crash dump date/time and crash details.
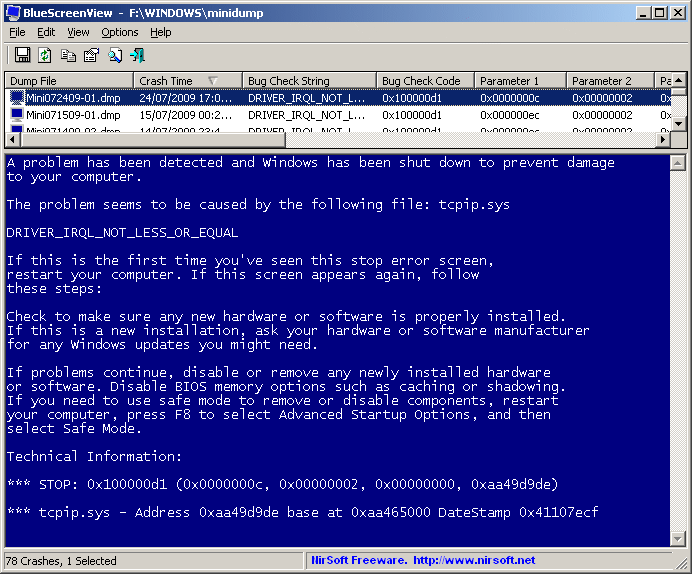
  • Allows you to view a blue screen which is very similar to the one that Windows displayed during the crash.
  • BlueScreenView enumerates the memory addresses inside the stack of the crash, and find all drivers/modules that might be involved in the crash.
  • BlueScreenView also allows you to work with another instance of Windows, simply by choosing the right minidump folder (In Advanced Options).
  • BlueScreenView automatically locate the drivers appeared in the crash dump, and extract their version resource information, including product name, file version, company, and file description.


http://www.nirsoft.net/utils/blue_screen_view.html

Top-5全能睇片工具

1:VLC media player

2:Media Player Classic

3:KMPlayer

4:GOM Player

5:MPlayer

RapidShare Search Engine

Mayoko is your ultimate RapidShare Search Engine.
Just enter what you are looking for, and we will search millions of files on RapidShare for you.

http://www.mayoko.com/

2009年8月12日 星期三

Configuring the OWA Direct File Access Feature

http://www.msexchange.org/tutorials/Drilldown-OWA-Direct-File-Access-Exchange-Server-2007-Part1.html

When installing Exchange Server 2007, the OWA direct file access feature is enabled by default, but if you enable forms-based authentication (FBA) on the respective OWA virtual directory, it only works when the user selects Private computer on the FBA logon page. If a user selects Public computer on the logon page, the OWA document access feature will be disabled, at least by default. If you, after installing the Exchange 2007 bits, want to change the default configuration settings, there are several knobs and features you can adjust on afterwards. In order to do so you need to open the Exchange Management Console, then navigate down to the Server Configuration node and select Client Access (see Figure 1).

Note:
Although the feature can be configured both from within the Exchange Management Console (EMC) as well as from the Exchange Management Shell (EMS), we’ll concentrate on the configuration options within the EMC in this article.


Figure 1: Client Access Server in the Exchange Management Console

Now select the server, on which the Client Access server role has been installed, in the Result Pane. Click the OWA (Default Web Site) virtual directory in the Result Pane then select Properties in the Action Pane (or simply right-click the vdir and select Properties in the context menu).

Note:
You can configure the OWA direct file access options per virtual directory, so if you for example, host multiple companies with each, with their OWA path configured, you can enable/disable OWA direct file access features per company.

Click the Private Computer File Access tab and you’ll see a screen similar to the one shown in Figure 2 below.


Figure 2: Private Computer File Access under the OWA (Default Web Site) Property Page

Here we can enable/disable the direct file access feature as well as customize it further. As expected the Direct File Access feature is enabled, now click the Customize button. This brings us to the screen shown in Figure 3.


Figure 3: Direct File Access Settings

When you have enabled the direct file access feature you can specify which types of files users can access without saving them first. You can do this by clicking the Allow button under Always Allow, which brings us to the screen in Figure 4 below.


Figure 4: Allowed File Types

As you can see you simply type the extension of the file type you want to allow, and enter the MIME types of the files that are allowed. Now click OK to exit the Allow list window.

Note:
The Allow list overrides the Block list and the Force Save list, so be wise when you add/remove file types from the Allow list.

The Block list and the Force Save list which also are accessed from the screen back in Figure 3 are identical to the Allow list, so I won’t show a screenshot of those here, just mention that the Block list, as the name implies, is used to specify any file types your users should not be allowed to access via OWA. The Force Save list is used to specify file types your users must save to disk before they can be opened. The last feature in Figure 3, which is called Unknown Files, is used to specify how unknown file types that haven’t been specified in the Allow list, Block list or Force Save list should be handled. You can select between Force Save, Allow and Block as shown in Figure 5.


Figure 5: Specify how Unknown File Types should be handled

Click OK to get back to the Private Computer File Access tab (Figure 2).

Besides the option of enabling/disabling the direct file access feature completely, there’s also a WebReady Document Viewing feature to be found here. When this feature is enabled, which is the case by default, the file types specified (see Figure 6) can be viewed in Internet Explorer, instead of opening the actual file type application such a Word, Excel, PowerPoint and PDF.


Figure 6: WebReady Document Viewing Settings

In part two of this article series, I’ll show you a Word file opened within Internet Explorer instead of Word using the WebReady Document Viewer feature.

As you can see in Figure 2, you can also force WebReady Document Viewing, before OWA tries to open the file in the respective application.

Note:
The WebReady Document Viewing feature is especially useful, if you’re for example accessing the OWA from an Internet Kiosk.

As can be seen back in Figure 2 there’s also the option of enabling/disabling access to either Windows File Share or Windows SharePoint Services under the Private Computer File Access tab.

Now click OK, then the Remote File Servers tab. As you can see in Figure 7 below, we also have the option of specifying the host names of servers from which the clients are allowed/denied access. Here it’s worth noting that the Block list takes precedence over the Allow list.


Figure 7: Remote File Servers tab under the OWA (Default Web Site) Property tab

In addition you can specify how to access files from remote file servers that are not in the Block list or Allow list, here you can choose between Allow and Block.

The very last configuration option there is to cover is related to which domain suffixes should be treated as internal Web Sites. This is done by clicking the Configure button and then entering the domain suffix for sites whose FQDN names should be treated as internal (see Figure 8).


Figure 8: Internal Domain Suffix List for sites whose FQDN name are treated as internal

You can now close the Property windows and exit the Exchange Management Console, as this was all there was to show you on the server-side.

In part two of this article series, I’ll show you how this OWA direct files access feature works in the OWA 2007 Premium client. Until then have a nice one!


Alright we’ve been through enough boring configuration settings now, so I bet most of you are eager to see the OWA direct file access feature in action, so let’s get going by logging on to a mailbox using OWA 2007. Remember you need to use the Premium client in order for the feature to work. Also bear in mind that, unless you changed the default configuration settings, you need to select This is a private computer on the forms-based Authentication (FBA) page shown in Figure 1 below.


Figure 1: OWA 2007 Forms-based Authentication Page

When we have logged on to OWA 2007, we need to click the Documents button in the left pane (see Figure 2).


Figure 2: Clicking the Documents button in the left pane

This brings us to the page shown in Figure 3, which is where the fun begins.


Figure 3: OWA 2007 Direct File Access page

As you can see, I haven’t accessed any Windows file shares or Windows SharePoint Services server using this account, or at least I didn’t add them to Favorites in the left pane.

Note:
Any SharePoint Folders added in the Outlook 2007 client will also be visible and accessible via the OWA direct file access page.

Let’s try opening a file share on an internal Windows file server in the organization. We do this by clicking Open Location in the left pane, where after we specify the UNC path to the share (see Figure 4).


Figure 4

Now let’s click open. As you can see all folders within the specified Windows file share is listed in the right pane (see Figure 5).


Figure 5: Accessing a Windows File Share on an internal server

If you’re using OWA on the internal network or if the FQDN of the Windows file share server (not likely) or Windows SharePoint Services server is published on the Internet, you also have the option of opening the folder list in Windows Explorer by clicking Open in Windows Explorer in the toolbar. Right under the Open in Windows Explorer link, you can click Add to Favorites; so that the particular folder you’re currently located in is added to the Favorites list in the left pane (see Figure 6). If you’re the right-clicking kind of guy, you can also right-click a folder to bring up a context menu, from where you can select Add to Favorites.


Figure 6: Adding file shares to the Favorites list

Another neat feature is the breadcrumb navigation to the right of the Add to Favorites button, a feature that makes it easy to get back to, for example the top level folder, if you for example are located several levels down in the folder hierarchy.

Let’s take a look at the folder context menu I mentioned before. Let’s for instance right-click on the folder called MSExchange.org. This brings up the context menu shown in Figure 7 below. As you can see we have four options here, Open which will simply open the folder in the right pane, Open in New Window which (you guessed right) will open the folder in a new browser window. We then have an option called Copy Shortcut, this option will copy the folder UNC to the clipboard. Right-clicking MSExchange.org and selecting Copy Shortcut would copy an UNC called file://ehvms07/fileshare/MSExchange.org to the clipboard. We already covered the Add to Favorites option, so I won’t talk more about that one.


Figure 7: Folder context menu

Ok now let’s try to navigate to a folder containing a file, in this case a Word file. As you can see in Figure 8 the file context menu is slightly different from the folder context menu. Selecting Open would open the file in the associated application, in this example Microsoft Office Word.


Figure 8: Right-clicking on a file

But what if you’re accessing your mailbox from, for example, an Internet kiosk? Well it doesn’t really matter, because then you simply select Open as Web page instead as I did with a word document in Figure 9 below. In the top of the browser window you can see the full name of the respective file as well as how big it is. You also have the option of opening or saving the particular file by either left clicking (will open file in the respective application, if installed locally on the machine from which you logged on to OWA) or right-clicking (saves the file to disk) the file.


Figure 9: Opening a file in a web page

Note:
It’s the new OWA 2007 WebReady Document Viewing feature which makes us capable of opening almost any type of file in a browser window, instead of the associated application. As some of you may know the WebReady Document Viewing feature also can be used to open message attachments in ordinary email messages.

The third option in the file context menu back in Figure 8 is Send By Email, which will attach the selected file as an attachment in a new Email message (see Figure 10).


Figure 10: Sending a file from a remote file share as an attachment

The last option in the context menu which is Copy Shortcut is similar to the one in the folder context menu. It will provide a UNC like the following:

Conclusion

The new direct file access feature is an extremely welcome addition to OWA, and makes the best web mail client in the world even better. I don’t think I’m the only one who has attended a conference or simply been on the move, and suddenly had the need to access a document or some other file type located on an internal non-exposed SharePoint site or UNC file share on your corporate network, without having the option of establishing a VPN connection. With the new direct file access feature this is no longer an issue, since you can access documents as well as many other file types directly from within an OWA session. Not only that, it’s also possible to open these documents in a browser window, should you be using, for example, an Internet kiosk without the required applications (such as Word, Excel, PowerPoint, PDF reader etc.) installed. You can even send one of the files via the direct file access feature as an attachment in an email message, without downloading the file to your local machine!

In addition it’s worth noting that even though the direct file access feature only supports read access to files stored on either a Windows File Share server or a Windows SharePoint Services server, you always have the option of downloading the document to your local machine for further editing.

When speaking the configuration settings on the server-side, it’s great to be able to control what type of files your users should be allowed access to, as well as being able to configure the feature per virtual directory/per user.
Remote Command Line On Windows

For a while now I’ve been curious if there was a way on Windows to get a remote command line from another computer. You know, just a plain old command prompt, that when you entered commands they ran on a remote computer instead of your own. This is a staple on Linux systems, since they are all based on the command line, but with GUI-based Windows it was proving trickier to do.
I had found some halfway solutions that never seemed to work right, and I wasn’t too happy with any of them. But today I think I finally found the answer I was looking for. It does depend on a free little software download, but aside from that there’s no installation or setup required on either computer.
I first read about it on this site. What you do is go to a certain MS TechNet page and download the PSTools package (linked in the right sidebar). This software is from Sysinternals, a development group that was acquired by Microsoft a couple of years ago. So it’s “official” MS software, much like the PowerToys.
Anyway, here are the instructions for use:
  1. Download PsTools.zip from this site.
  2. Extract to a folder on your hard drive. If you can put them in the path, like in C:\Windows\System32, even better.
  3. Open a Command Prompt: Start > Run > cmd.exe
  4. Change to the directory you extracted the files to: cd c:\pstools, for example.
  5. Enter the command psexec \\RemoteComputer cmd.exe. Replace RemoteComputer with the name of the computer you want to take control of. You have to have admin rights on the remote computer.
  6. A Sysinternals EULA might pop up. Accept it.
  7. Watch as a new command prompt appears in your console window. You’re now controlling the remote computer!
I really think this is something that should be folded into Windows itself. And maybe it will be, since Sysinternals is under Microsoft control now. I know that when I’m working from home, or working on my Tahoe office computers from Carson City, sometimes I just want a command line on the remote computer, especially if I’m doing a little housekeeping behind the scenes while a user is on the computer. Now I can do it with no problem, now that I’ve found this neat little tool.
And PsExec is just one of 12 tools in the PsTools package. The rest of them are probably just as useful.
 
範例:
c:\>psexec \\140.137.215.118 -u bar -p 1234 cmd.exe
C:\>shutdown /s

2009年8月11日 星期二

用WIN自带防火墙,轻松实现之允许指定IP访问本地共享资源.

RT,自己挖出来的,不知道这个螃蟹大家哟吃过没?

看图依次操作吧,,,,标注的很清楚了 现在开始喜欢TX的截图+标注工具了 呵呵

1.启用防火墙
TM截图未命名00.jpg


2.选打印机共享.........废话了

TM截图未命名.jpg


3.我的习惯是4个端口都修改....其他方式没尝试过
TM截图未命名2.jpg


4.范围里吧允许访问的IP地址加上,格式:
IP1,IP2,IP3
不加掩码就是默认的IP段对应掩码咯,没尝试过重新划分的掩码是否支持...俺太懒了 呵呵
TM截图未命名3.jpg

2009年8月10日 星期一

高速檔案複製~利害

Winmend File copy


免費相片轉換好幫手

Photomeister

Do you take digital photos? Are you looking for a software package that can do all the photo handling for you?

    1. Import your photos from your camera
    2. Improve your photos
    3. Impress others with your photos
You came to the right place: PhotoMeister is the solution for digital photos and runs under Windows 95/98/NT/XP/2000!

http://www.photomeister.com/


找出拖慢電腦元兇

Yet Another (remote) Process Monitor

Yet Another (remote) Process Monitor (YAPM) is a powerful application that allows to view and manage your running tasks, processes, threads, modules, windows, handles, network connections and your services on a local or on a remote machine. YAPM offers lots of features to manipulate them, such as privilege management, memory management, a complete history of statistics, a dependency viewer... etc.

http://yaprocmon.sourceforge.net/

電腦維修百寶箱

SystemRescueCd is very easy to use. Just download the ISO file, and burn it. Under Linux, you just need cdrecord, and you can use Nero under Windows. When the CD-ROM is burned, you can boot it.

http://sysresccd.org/Download

Free Bandwidth Monitoring and Usage Reporting

NetWorx


NetWorxhttp://www.softperfect.com/products/networx/

2009年8月7日 星期五

神秘IP捉迷藏(攻破IP封鎖)

IPHider

http://www.allanonymity.com/ip-hider-hide-ip-software/

IP Hider masks the real IP of a user, allowing him to browse all kind of pages without ever worrying that the ISPs or any other marketing tool is monitoring your surfing habits or spammers are attacking your computer. The simplest way to do this is to have traffic redirected through anonymous proxies.

手指記憶卡檔案還原

Easy Flash Recovery is an easy to use image recovery software that was designed to recover deleted, formatted and lost digital photos, images and pictures from any types of media cards. Literally it is a "first aid kit" for anyone who needs to recover deleted files and digital photos. It will help in the case if files accidentally deleted or lost due to hardware (camera or memory) malfunction or flash memory gets re-formatted.

http://www.easy-flash-recovery.com/flash_recovery.html

調用程式(Debug.exe)

開始>執行>Debug ,出現提示符[- ] ,就可以開始Debug

如果輸入D FE00:0 ,按下Enter,就可以睇到主機版Bios的廠商資訊,接著再輸入D FFFF:5 L 8,就可以睇到BIOS版本日期.

如要離開請打Q

如果輸入D C000:0090 就可以看到system 中顯示卡的資訊

2009年8月6日 星期四

禁止其他使用者訪問(控制台)

開始>執行>gpedit.msc>本機電腦>使用者設定>系統管理範本>控制台>禁止訪問控制台>已啟用

關機時自動關閉停止回應程式

開始>執行>鍵入regedit>HKEY_USERS\DEFAULT>Control Panel>Destop,在右邊把AutoEndTasks的數值改為1

2009年8月5日 星期三

Rainbow Web Server 家用版(轉自Jerry_IT資訊技術手札)

目前這套WEB架設軟體還蠻不錯使用的,有推出免費版給大家使用,反正自己用XP架設也只有10連線數,雖然家用版也是,不過至少可以設定到更細項的設定。

彩虹網站伺服器是ㄧ套支援標準HTTP的網站伺服器,簡便的安裝與人性化的管理介面,適合一般中小企業使用。

功能簡介:

管理工具與伺服器採分離式設計,增加管理上之方便性與安全性。

  • 伺服器以系統服務方式執行,具有較高之效能表現。
  • 自訂錯誤畫面。
  • 採用多行程、多執行緒方式執行。
  • 即時系統事件紀錄。
  • 預設網頁設定。
  • 支援 GET、POST、HEAD 方法。
  • 目錄瀏覽功能 。
  • 內建原生 ASP 編譯器。
  • 支援 VBScript 與 JScript。
  • 支援 Html、PHP、Perl、CGI 等。
  • 支援Cookie ( 陣列與列舉)。
  • 支援SSI (Server Side Includes)。
  • 系統統計資料分析。
  • 多項增加效能之進階設定。
  • 支援ASP 快取管理。
  • 新增或自定 MIME 內容型態。
  • IP 攔截功能。
  • 支援虛擬目錄(企業版)。
  • 支援多網域(企業版)。
  • 主目錄與虛擬目錄驗證功能(採用帳號密碼驗證)。
  • 支援錯誤失敗保護機制,避免網站程式錯誤或駭客入侵影響系統安全。

官方下載網站:
http://i-freelancer.net/Rainbow/WebServer.htm

下載家用版

線上說明書:
http://i-freelancer.net/help/RainbowWeb_WebHelp/index.html


開啟後一開始先安裝服務


安裝好服務後,預設為停用,按下啟動服務


目前正在執行為啟動中


一般設定,可以設定主目錄及PORT


進階設定可以設定最大連線數,家用版限制最大10個連線數


安全設定IP攔截


MIME類型


CGI 設定


虛擬目錄設定

2009年8月4日 星期二

為相片加入 文字及圖片水印

Name: watermarklib
Website: www.watermarklib.com

儲存媒體壞了(檔案也可起死回生)

Roadkil's Unstoppable Copier

Recovers files from disks with physical damage. Allows you to copy files from disks with problems such as bad sectors, scratches or that just give errors when reading data. The program will attempt to recover every readable piece of a file and put the pieces together. Using this method most types of files can be made useable even if some parts of the file were not recoverable in the end.

The program can be used as a daily backup system using its batch mode functions. A list of transfers can be saved to a file and then run from the command line to perform the same batch of transfers on a regular basis without having to use the GUI interface. The program supports command line parameters which allow the application to be run from schedulers or scripts so it can be fully integrated into daily server tasks.


http://www.roadkil.net/listing.php?Category=1

Roadkil's Unstoppable Copier

可對資料夾作重組(小巧而全面的Defrag方法)

Software:Defraggler

http://www.defraggler.com/

2009年8月3日 星期一

禁止更改網際網路設定

機碼:HKEY_CURRENT_USER\Software\Policies\Microsoft\Internet Explorer\Restrictions
名稱:NoBrowserOptions
型態:REG_DWORD
值:1

說明:開啟「網際網路選項」時,會出現「這個作業已經被取消,因為這個電腦受到限制。請和系統管理員連絡。」的訊息。

Http File Server

You can use HFS (HTTP File Server) to send and receive files.

It's different from classic file sharing because it uses web technology to be more compatible with today's Internet.

It also differs from classic web servers because
it's very easy to use and runs "right out-of-the box".

Access your remote files, over the network.

It has been successfully tested with Wine under Linux.

FTP server (Active Mode , Passive Mode)

Active Mode:
在Active Mode中 FTP Client 以隨意和大於1024的command Port連接FTP Server 的Command Port 21, 然後FTP Clinet 以該隨意Port 加一的Port Number 來與 FTP Server的 Data Port (Port20)溝通. (1021)

Passive Mode:
在Passive Mode FTP Client 會初始與Server的連結,以解決FireWall 過濾由Server 到Client的Incoming Data Port 連接. 當Client開啟FTP連接,用戶會開啟一個隨意和大於1024的本地Port,而另一個則是這個隨意Port加一.第一個Port通常會連接到Server Port 21和傳送PASV命令要求進行Passive Mode,但與Active Mode 最大的大同是之後不是由Server 連接Client的Data Port,而是Server 開啟一個隨意Port和通知Client,讓Client 以自身的隨意Port加一去連接Server的隨意Port來傳送數據.

備份MSN表情圖示

Software name: MSN Custome Emoticons Editor (Free )
WebSite: http://qoo942.googlepages.com/cee

Partition Resize 工具(34國語言版)

軟件名稱:Gparted(免費)

WebSite: gparted.sourceforge.net

Intel官方晶片組檢查

Intel Chipset Identification Utility 下載:

http://downloadcenter.intel.com/filter_results.aspx?strTypes=all&ProductID=861&OSFullName=Windows+XP+Professional*&lang=eng&strOSs=44&submit=Go!

強化版Alt-F4 .強行關閉程式

SuperF4 kills the foreground program when you press Ctrl+Alt+F4. This is different from when you press Alt+F4. Alt+F4 only asks the foreground program to exit, allowing it to decide for itself what to do.

You can also kill a process by pressing [the windows key]+F4 and then clicking the window with your mouse. Note that the mouse cursor does not change to reflect that SuperF4 is in this mode. You can press escape or the right mouse button to exit this mode without killing a program.

http://code.google.com/p/superf4/