WELCOME

2010年11月30日 星期二

Desktop Icon備份

DesktopOK 2.26


Suitable for Microsoft Windows : Servers 2000/2003/2005 Win 98/XP/Vista and Windows-7 x64/x86


Save and restore the desktop icon positions.


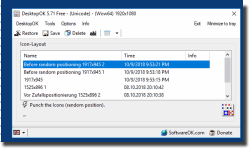
Save and restore the positions of icons.
DesktopOK is a small but effective solution for user that have to change the screen resolution often.

:::: Features :::::
# Save your favorite icon locations for each screen resolution.
# Each user can then have his own arrangement.
# Automatically hide and display desktop icons
# Minimises to tray area for easy access.
# Easily minimize all of the windows on your screen
# Launch at Windows startup.
# Autosave
# Portable


Operating systems: Windows 7, Windows Server 2008, Windows Vista, Windows 2003, Windows XP, Windows 2000, Windows Me, Windows NT, Windows 98

Start the program. The first time that you use it the program it will present you with a license screen. The program is free and the license info is only displayed the first time (per PC).

DesktopOK does not have to be installed and can be executed easily from the desktop, and can be carried on a small usb-stick or other memory device.

勁過Find MY Phone Notebook/Android 防盜追蹤法

Rest safe.

Prey lets you keep track of your phone or laptop at all times, and will help you find it if it ever gets lost or stolen. It's lightweight, open source software, and free for anyone to use. And it just works.

2010年11月29日 星期一

USB Disk Security for Windows

Award-winning protection to secure your PC against threats from USB drive.

USB Disk Security is a top-rated antivirus utility that protects your PC against any threats via USB storage. We find and fix threats that your current security products missed...

To download and install USB Disk Security please follow these instructions.

1. Download USB Disk Security from CNET

Click the download button below to download from CNET.

Get it from CNET Download.com!

2. Click the Download Link

To complete your download from CNET, click on the Download Now link to start the download.

3. Save the installer

When the File Download dialog box appears click the "Save" button and download it onto your computer.


4. Run the installer

Please run the installer and follow the Setup Wizard to complete the installation.

KillCopy

Switch to russian
Download KillCopy v2.85 584 Kb
47 Kb
Check how KillCopy looks
Additional skins for KillCopy                      
Program for copy files by network. Can also copy files on local drives - sometimes it can speed up copy of large files by 2-3 times. User-frendly skin based interface. Build-in explorer shell make is very simple in use. You can download any files and directories by pressing right button and choosing KillCopy to.. to change target directory. KillCopy can shutdown system after copy completes, can play sound and ask user to open target directory. KillCopy can copy files to some targets simultaniously. Also you can start KillCopy from command line. 

Shuangs Audio Editor

Shuangs Audio Editor
Software: Shuangs Audio Editor
Version: 3.1
License: Freeware
Size: 1.26 MB
OS: Windows 2000/XP/2003/Vista/7
 
Download

        Shuangs Audio Editor is a free audio editor tool. It can accurately split WAV, MP3 and WMA files, and you can also design specially good effects for audio files, such as setting volume, fading in and fading out, etc.

Dataram RAMDisk

Techworld ranks Dataram RAMDisk 4 out of 5 stars! Read the review.

RAMDisk Uses:

  • Speed up Internet page load times
  • Control what files and programs are stored into memory (loaded at boot time)
  • Create temporary disks for added security
  • Speed up disk-to-disk activities such as video encryption and audio ripping
  • Accelerate databases
  • Reduce compile times

RAMDisk Features:RAMDisk

  • Freeware version (up to 4 GB disk size). Disks larger than 4GB require registration and a license which can be purchased for $9.99 USD.
  • Universal version for WindowsXP/2000, Vista (32 and 64-bit) Home Basic, Home Premium, Business and Ultimate, Windows Server 2003 Standard, Web and Enterprise Edition
  • Up to 32 GB disk in Vista and Windows 2003, 2008 Server (registered mode)
  • Save and load features allow RAMDisk to appear as persistent storage even through reboots
  • Supports Windows 7

EasyBCD 2.0.2

Description

Quantcast
EasyBCD is NeoSmart Technologies' multiple award-winning answer to taking control of your bootloader. EasyBCD extends and revamps the Windows Vista/Windows 7 BCD bootloader, and with EasyBCD, almost anything is possible. Setting up and configuring a dual-boot between Windows 7, Windows Vista, older versions of Windows such as XP & 2003, Linux, Ubuntu, BSD, and Mac OS X is a breeze. You just point & click and EasyBCD does the rest.
EasyBCD is geared for users of all kinds. Whether you just want to add an entry to your old XP partition or want to create a duplicate for testing purposes; if you're interested in debugging the Windows Kernel or septuple-booting your seven test operating systems, EasyBCD is the key.
  • Boot into XP/Vista/7/Ubuntu/OS X and more!
  • Boot from USB, Network, ISO images, Virtual Harddisks (VHD), WinPE, and more!
  • Repair the Windows bootloader, change your boot drive, create a bootable USB, and more!
  • Rename entries, set default boot target, change BCD timeout, hide the boot menu, and more!
  • Create your own custom boot sequence, hide drives on boot, backup and restore configurations, and more!
EasyBCD is used and recommended by Microsoft, PC-World, PC-Magazine, Softpedia, PC-Welt, and hundreds more! Don't get left out – download it today, it's free!!


EasyBCD is so awesome, our users can't believe it's absolutely 100% free! Support included, too! Forget BCDEDIT, GRUB, StinkyBootPRO, the command-line and everything else — it's EasyBCD to the rescue!!
 

Credits

EasyBCD is a non-profit NeoSmart Technologies' project currently written and maintained by Mahmoud H. Al-Qudsi.
If this program helped you out or you just feel like supporting free software, please consider making a non-profit donation to keep NeoSmart Technologies free for everyone – every penny helps. This program, like all other NeoSmart projects, is provided absoloutely free of charge. See the included license for more details, or contact us with any license-related questions.

手動修復MBR(COMMAND)

bootrec /fixmbr

bootrec /fixboot

2010年11月15日 星期一

http://www.cbs-soft.com/index.htm

SpeedConnect Internet Accelerator v.8.0 just released!

Top internet accelerator (according to PC Magazine), a network settings optimizer to speed up your existing Dial-Up Modem, DSL, Cable, Wireless, LAN, High-speed internet connections.

SpeedConnect Internet Accelerator is a powerful Windows application designed to optimize your network connection and speed up all your internet activities. This translates into a faster internet connection, faster browsing and email, faster downloads, faster online gaming, improved Skype connection.


SpeedConnect is available for immediate download. Try it FREE!

Download SpeedConnect
SpeedConnect Internet Accelerator
 Designed for Windows® 7, Vista™, XP.

The speed of your network connection doesn't just depend on the speed of your hardware. Windows is an operating system that is designed to work on a variety of different hardware and network setups. Because of the abstract nature of the operating system, it cannot be optimized for user-specific hardware setups.

Profile Relocator

Product
Version
License
Last Worked On
Development Status
Requires
Download (105KB)
Profile Relocator
1.00
Freeware
2nd April, 2010.
Complete
Microsoft .NET Framework 2.0
Click here [change log] [hash] [pad]

Description
Profile Relocator is a step-based application that allows the re-locating of the Windows Users profile directory. Once re-located, any created profiles will appear in the new location in their entirety. The advantage to doing this allows profiles to be stored in a location that doesn't reside on the system drive, ensuring that profile data isn't compromised as a result of re-installation or system failure.

Profile Relocator has been designed to work with Windows XP, Vista, and 7.

Please note that this application should ideally be used on new installations of Windows; PR should be used, and then the final profile should be created. See the included documentation for step-by-step information. PR will not move existing profiles as this can be dangerous.

Screenshots
Language Selection Step 1 Step 3 About 

檔案屬性隨心變 v3.7

About Inkscape

An Open Source vector graphics editor, with capabilities similar to Illustrator, CorelDraw, or Xara X, using the W3C standard Scalable Vector Graphics (SVG) file format.
Inkscape supports many advanced SVG features (markers, clones, alpha blending, etc.) and great care is taken in designing a streamlined interface. It is very easy to edit nodes, perform complex path operations, trace bitmaps and much more. We also aim to maintain a thriving user and developer community by using open, community-oriented development.

News

Inkscape 0.48 Essentials for Web Designers

November 10, 2010 Packt Publishing have just released a new book on Inkscape by Bethany Hiitola called "Inkscape 0.48 Essentials for Web Designers". Surprisingly this book is the first to cover features of our August release and definitely first to focus exclusively on web design. The book covers a wide range of topics from creating impressive web site designs to drawing various graphics elements, such as icons, charts, maps etc. "Inkscape 0.48 Essentials for Web Designers" is available as both hard copy and eBook.

2010年11月9日 星期二

Configuring IMAP over SSL with SBS 2003 Standard

Follow these steps to enable and configure IMAP using SSL.
  1. Enable the IMAP service on SBS 2003
    1. Open the Services control panel (Start -> Run -> services.msc or Start -> All Programs -> Administrative Tools -> Services)
    2. Scroll down to find Microsoft Exchange IMAP4 (see Figure 1).


      Figure 1
    3. Double-click on the service to open the properties.
    4. In the General tab, change the Startup Type to Automatic (see Figure 2).

       
      Figure 2
    5. Click Start to start the IMAP service.
    6. Click OK to close the Properties window.
    7. Confirm that the IMAP service is started and set to Automatic in the services list (see Figure 3).


      Figure 3
  2. Configure IMAP services in Exchange
    1. Open Exchange System Manager (Start -> All Programs -> Microsoft Exchange -> Exchange System Manager).
    2. Expand Servers, your server name, Protocols, and IMAP4.
    3. Select the Default IMAP4 Virtual Server (see Figure 4), right click and select Properties.


      Figure 4
    4. Select the Access tab, then click on the Certificate button under "Secure communication" (see Figure 5).

       
      Figure 5
    5. Go through the Web Server Certificate Wizard. Click Next to start (see Figure 6).


      Figure 6
    6. Select "Assign an existing certificate" and click Next (see Figure 7)


      Figure 7
    7. Select the public certificate name and click Next (see Figure 8).


      Figure 8
    8. Verify the proper certificate has been selected and click Next (see Figure 9).


      Figure 9
    9. Complete the wizard by clicking Finish (see Figure 10).


      Figure 10
    10. Select the "General" tab and click the "Advanced" button (see Figure 11).


      Figure 11
    11. Confirm the ports for IMAP are 143 and 993 (for SSL) and the IP address is "All Unassigned" (see Figure 12).


      Figure 12
    12. Click OK to close the Advanced dialog box, then click OK to close the properties of the IMAP4 Default Virtual Server.
  3. Enable SSL connections for the SMTP service
    1. Open Exchange System Manager.
    2. Expand Servers, your server name, Protocols, SMTP, and select the Default SMTP Virtual Server (see Figure 13).


      Figure 13
    3. Right-click on the Default SMTP Virtual Server and select Properties.
    4. Select the Delivery tab, then click Advanced (see Figure 14).


      Figure 14
    5. In the "Fully-qualified domain name" field, enter the full public DNS name of the server (see Figure 15) and click OK.


      Figure 15
    6. Select the Access tab and click the Certificate button under "Secure communication" (see Figure 16).


      Figure 16
    7. Select "Assign an existing certificate" and click Next (see Figure 17).


      Figure 17
    8. Select the public certificate name, and click Next (see Figure 18).


      Figure 18
    9. Confirm the correct certificate selection and click Next (see Figure 19).


      Figure 19
    10. Click Finish to complete the wizard (see Figure 20).


      Figure 20
    11. In the Access tab, click Communication under "Secure Communication."
    12. In the Security dialog box, ensure that the "Require secure channel" checkbox is turned off (see Figure 21).


      Figure 21
    13. Click OK to close the Security dialog, then click OK to close the Default SMTP Virtual Server properties.
At this point, you are able to make SSL connections to both the IMAP4 service as well as the SMTP service.